Introduction
nVision is a computer vision development system. The main use is to create automated machine vision applications that are used in the industry. It uses a graphical approach to programming, which leads to much shorter development time, compared to traditional programming. In addition, the learning curve is shallow, which allows you to be immediately productive.
Since nVision has valuable and powerful tools for image inspection, it has proven to be usable in the scientific laboratory as well. It is the tool of choice in the lab, when a Photoshop-based approach is too laborious and when you need fast results. The graphical programming helps in the lab as well to quickly create the needed results in an automated way.
nVision helps you with a variety of vision based tasks needed in the industry:
- Check the position of a part to guide a handling systems or to put a vision tool in the right position.
- Identify a part based on marks, shape or other visual aspects.
- Verify a part to check if it has been built or assembled correctly.
- Measure a parts dimensions.
- Inspect a part for defects.

The nVision window.
Make sure to read the nVision Quick Start Guide. It contains the most important information on a single page.

Program Editions
nVision has two main components: the nVision Designer is the rapid application development system and the nVision Runtime is the runtime part. The nVision Designer provides a graphical user interface and a graphical programming system. The nVision Runtime provides the computer vision functionality in a modular way and a facility to execute the graphical programs. It also has the means to display a HMI (human-machine interface).
nVision Designer is what you use to create applications. When these applications are to be deployed to the machine on the factory floor, usually only the more cost-effective and modular nVision Runtime is used.
nVision Designer
nVision Designer comes with complete feature sets targeted to the intended audience.
| Product | Description |
|---|---|
| nVision Designer MV | Targeted for machine vision development. |
| nVision Designer L | Targeted for laboratory use. |
| nVision Designer U | The ultimate version has everything. |
nVision Runtime
The following runtime modules are available.
| Module | Description |
|---|---|
| Image Processing | Contains basic image processing functionality, both monochrome and color, including camera support. |
| Analysis, Measurement | Contains image analysis functionality, blob analysis, camera calibration, gauging measurement. |
| Template Matching | Contains the matching and searching functionality, template matching, geometric pattern matching. |
| Barcode, Matrixcode | Contains the barcode reading functionality, both linear and two dimensional symbologies. |
| OCR, OCV | Contains the Optical Character Recognition and Optical Character Verification functionality. |
Module Matrix
The table shows which modules are included in which designer edition.
| Module | MV | L | U |
|---|---|---|---|
| Image Processing | * | * | * |
| Analysis, Measurement | * | * | * |
| Template Matching | * | * | |
| Barcode, Matrixcode | * | * | |
| OCR, OCV | * | * |
Requirements
nVision (Designer and Runtime) runs on Windows 7 or higher, 64 bit (recommended) or 32 bit (memory limitations apply). It supports many cameras of different vendors, either via the GigE Vision, USB3 Vision, and GenICam standards or directly via the manufacturers SDK.
Licensing
nVision (Designer and Runtime) are licensed to the specific hardware. In order to run nVision, you need a license key.
When nVision is started for the first time, it needs to be activated. In addition to the license key, activation needs a hardware key, which is determined automatically. The activation process uses the he hardware key, together with the license key and creates an activation key. It is the activation key - in combination with the two other keys - that actually unlocks the nVision software.
Usually, activation works through an internet connection and is simple and transparent. If you copy your license key to the clipboard before you start nVision for the very first time, you will hardly notice the process. Otherwise, a dialog such as the following will be displayed:

The nVision licensing dialog.
In order to continue, you should enter your license key and press the Return key. nVision will contact the licensing server and use the returned activation key to unlock. If the license server cannot be connected for some reason, you can phone (+49 8245 7749600) or write an email to info@impuls-imaging.com to tell us both your license key and the hardware key, and we will provide you with an activation key that you can enter manually.
Activation is perpetual for a specific hardware. If the hardware changes, this is considered a new hardware, which means that you have to activate nVision again. While nVision is licensed to one machine only, one license key permits three activations to cover the case of defective hardware.
Camera and Device Interfaces
The primary interfaces to cameras used in nVision are the GigEVision and the USB3 Vision interfaces. These interfaces are standardized. Image data can be accessed via GenTL and camera properties can be read and written via GenICam.
For cameras interfaced via GenTL and GenICam, the full set of properties is accessible from within nVision.
The camera properties are accessible in the form of a properties window.

The camera properties window.
In addition, the camera properties can be read and written from within a graphical pipeline, i.e. the properties can be changed from within a program.
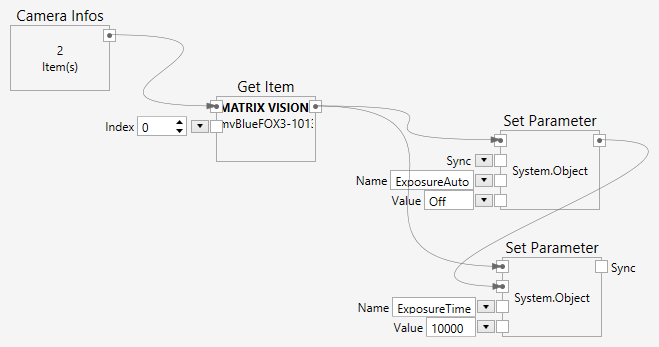
Writing camera properties from within a pipeline.
Secondary interfaces to cameras and devices exist via manufacturer SDKs for historical reasons. USB2 cameras are interfaced this way, since they were available before standardization, as well as interfaces to frame grabbers.
The following table lists tested devices:
| Manufacturer | URL | Device | Interface | |
|---|---|---|---|---|
| Allied Vision |  |
www.alliedvision.com | GigE Cameras | GenTL / GenICam |
| Basler |  |
www.baslerweb.com | GigE Cameras | GenTL / GenICam |
| Baumer |  |
www.baumer.com | GigE / USB3 Cameras | GenTL / GenICam |
| Flir |  |
www.flir.com | GigE Cameras (A315) | GenTL / GenICam |
| IDS |  |
www.ids-imaging.com | USB Cameras | Direct (Vendor SDK) |
| IDS | |
www.ids-imaging.com | GigE Cameras | GenTL / GenICam |
| JAI |  |
www.jai.com | GigE / USB3 Cameras | GenTL / GenICam |
| Leutron |  |
www.leutron.com | USB Cameras | Direct (Vendor SDK) |
| Gardasoft |  |
www.gardasoft.com | GigE Flash Controller | GenTL / GenICam |
| Matrix Vision |  |
www.matrix-vision.com | Framegrabber | Direct (Vendor SDK) |
| Matrix Vision | |
www.matrix-vision.com | USB Cameras | Direct (Vendor SDK) |
| Matrix Vision | |
www.matrix-vision.com | GigE /USB3 Cameras | GenTL / GenICam |
| Net GmbH |  |
www.net-gmbh.com | USB Cameras | Direct (Vendor SDK) |
| Point Grey |  |
www.ptgrey.com | GigE / USB3 Cameras | GenTL / GenICam |
| Sentech | www.sentecheurope.com | GigE / USB3 Cameras | GenTL / GenICam | |
| Smartek |  |
www.smartek.vision | GigE Cameras | GenTL / GenICam |
| SVS Vistek |  |
www.svs-vistek.com | GigE Cameras | GenTL / GenICam |
| The Imaging Source |  |
www.theimagingsource.com | GigE Cameras | GenTL / GenICam |
| Various |  |
Webcams | Direct (Windows Media Foundation) | |
| Ximea |  |
www.ximea.com | USB3 Cameras | GenTL / GenICam |
All other GigE Vision or USB3 Vision capable cameras should work with nVision right our of the box, but have not been tested in-house so far.